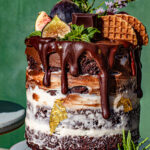
How to Make this Super Glam Kalamansi Chocolate Cake
A super glam Kalamansi Chocolate Cake made with a cake box mix. All you need are fresh fruit and herbs and drippy chocolate to make it this gorgeous!
Servings: 2 Mini 4 inch cakes
Equipment
- 4 Paper Straws
Ingredients
For the Cake
- ⅓ Cup Almond Milk (or any milk)
- ⅓ Cup Melted Vegan Butter (or regular butter)
- 2 Tablespoons Kalamansi Juice
- 1 Tablespoon Kalamansi Rind (optional)
- ⅓ Cup Apple sauce
- 1 Box Chocolate Cake Mix
Chocolate Filling
- 1 Tub Ready Made Chocolate Frosting
- 1 Tub Ready Made Vanilla Frosting
Chocolate Drip
- ½ Cup Chocolate
- 1 Tablespoon Coconut Oil
Garnishes
- 2 Mini Figs
- 4-6 Grapes
- 1-2 Mint Sprigs
- 1-2 Rosemary Sprigs
- 3-6 Mint Flowers or any edible mini flowers
- 1-2 Edible Gold Sheets
- 1 Chocolate Bar
- 2 Mini Stroopwaffles cut in half
Instructions
- Prep. Pre-Heat Oven to 325F. Spray two 4 inch cake tins with baking spray and line the bottom with parchment paper.
- Make the Cake. In a large bowl mix together the milk, melted butter, kalamansi juice and rind (if you have it) and the apple sauce. Mix well. Then add in the chocolate cake mix and mix well again.
- Bake the Cake. Divide the batter between the two 4 inch cake tins and bake for 18-20 minutes.
- Cool the Cake. Leave to cool in the tins for 5 minutes and then remove from the tins and cool the cakes on a wire rack. Once they are fully cool wrap each of them in plastic wrap and freeze. At least an hour or even better overnight. It makes it so much easier to cut in half and frost.
- Frost the Chocolate Cake. Take out the layers from the freezer. Unwrap the bottom layer and cut in half. Spread some chocolate frosting on the bottom of a cake stand to act as glue then put the bottom layer on top. Scoop about ¼ cup of frosting on the cake layer spreading it evenly and just over the edge. Place the layer of cake on top and repeat with the frosting. Cut the second cake in half and repeat. Leave the frosting sticking out of the edge.Before spreading the last bit of frosting on the top take 2 paper straws and stick it right through the cake. This keeps it from slipping and sliding. Cut of any extra straw from the top and cover with additional frosting.
- Frost the Vanilla Cake. Take out the layers from the freezer. Unwrap the bottom layer and cut in half. Spread some vanilla frosting on the bottom of a cake stand to act as glue then put the bottom layer on top. Scoop about ¼ cup of frosting on the cake layer spreading it evenly and just over the edge. Place the layer of cake on top and repeat with the frosting. Cut the second cake in half and repeat.Before spreading the last bit of vanilla frosting on the top take 2 paper straws and stick it right through the cake. This keeps it from slipping and sliding. Cut off any extra straw from the top and cover with additional frosting.For the Vanilla cake we are going to do a light frosted effect. To do that heat up a butter knife or offset spatula by running it under hot water. Dry it with a towel and then use the flat side to just skim any frosting that is sticking out. It smooths it out and creates a nice effect.
- Place both cakes in the fridge to set while you make the chocolate drip
- Make Drip. Place the chocolate and coconut oil in a microwave safe bowl and heat up in 15 second intervals until the chocolate has melted slightly. You don't want it fully melted. Mix it until it is nice and smooth but not too runny. If it is a little bit runny add a small piece of chocolate until you get a nice drippy consistency.
- Drip it. Take the cakes out of the fridge. Start in the middle by pouring a tablespoon or two in the middle of the cake. Then very very slowly start pushing the chocolate on to the side so it starts dribbling over. Do this as many times as you want. Eventually the drip will stop dripping and become solid. This is why it is important to do this on very cold cakes.Repeat the process with the second cake.
- Garnish. practice what you will put on the top of the cake on a plate so that it's easier to change your mind. As once the fruit hits the chocolate, it's stuck. Play around with the placement. The higher fruit and items go in the back for added drama and then as you get to the front of the cake use smaller fruit and herbs. Use your creativity.
